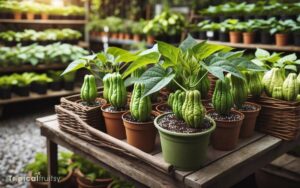
How to Plant a Chayote? 7 Easy Steps!
To plant a chayote successfully, start by choosing a mature, healthy chayote fruit from a grocery store or nursery.
Select a planting site with full sun exposure and well-draining soil. Amend the soil with organic matter to improve fertility and drainage.
Plant the chayote fruit at a 45-degree angle with the stem end up, leaving the top half exposed. Water the plant regularly, but avoid waterlogging.
Mulch around the plant to retain moisture and regulate soil temperature. Monitor for pests and diseases and take appropriate measures for control. Harvest chayote when the fruit is firm and about 4 to 8 inches in size.
Chayote planting involves several critical steps to ensure the growth and yield of the plant:
Cultivate chayote in your garden for a versatile and nutritious addition to your meals.

Key Takeaway
Step 1: Selecting Your Chayote
Choosing an appropriate chayote for planting requires selecting a healthy, mature fruit free from blemishes and signs of decay.
The ideal candidate should exhibit a firm texture, indicating turgor pressure consistent with viable cellular health, which is critical for germination and subsequent growth.
A mature chayote will typically possess a deep green hue, although some varietals may exhibit different colors when ripe.
It is crucial to avoid specimens with any signs of withering or soft spots, as these may suggest the onset of rot or infection by pathogenic organisms, which could compromise the fruit’s ability to sprout.
Furthermore, the presence of a visible sprout or bud is a positive indicator of vitality and can enhance the success rate of propagation.
Step 2: Preparing the Planting Site
Prior to sowing chayote seeds, a comprehensive analysis of the soil’s composition and nutrient profile is imperative to ensure optimal plant growth and yield.
The site’s exposure to sunlight must be evaluated, as chayote plants require sufficient daily light to thrive, making the selection of a location with ample, consistent sunlight crucial.
Additionally, implementing measures for proper water drainage is essential to prevent root rot and other moisture-related diseases, necessitating the modification of the planting area to facilitate excess water runoff.
Soil Quality Assessment
Evaluate the soil at your intended planting site to ensure it has adequate drainage, fertility, and a slightly acidic to neutral pH, which are essential conditions for chayote cultivation.
Soil that retains water excessively may lead to root rot, while soil that is too alkaline can prevent chayote plants from absorbing nutrients effectively.
| Soil Attribute | Ideal Condition for Chayote | Emotional Value |
|---|---|---|
| Drainage | Fast-draining | Sense of security |
| Fertility | High organic matter content | Promise of growth |
| pH Level | 6.0 to 7.0 (slightly acidic to neutral) | Balance and harmony |
To achieve these conditions, incorporate organic compost to enrich the soil and test the pH using a soil testing kit.
Adjustments can be made by adding appropriate amendments. This careful preparation lays the foundation for a thriving garden that resonates with vitality.
As we consider the life-giving qualities of well-prepared soil, let’s now turn to the importance of sunlight exposure considerations for our chayote plants.
Sunlight Exposure Considerations
Consistently ensuring that your chayote is planted in a location that receives ample sunlight is crucial, as these vegetables require full sun for optimal growth and fruit production.
Chayote (Sechium edule), a member of the Cucurbitaceae family, thrives under direct light for a minimum of six to eight hours per day.
This exposure maximizes photosynthetic activity, which is vital for the plant’s conversion of light energy into chemical energy, fueling its growth and fruiting potential.
When preparing the planting site, choose an area with southern or southwestern exposure to increase the duration of sunlight received, if possible.
It is imperative to monitor the daily and seasonal sun patterns, adjusting for any potential shade from buildings, trees, or landscape changes that might impede light availability.
Adequate sunlight also helps in preventing fungal diseases, which can proliferate in shaded, moist conditions.
Adequate Drainage Provision
Proper soil drainage is essential when preparing the planting site for chayote to prevent waterlogged conditions that can lead to root rot and other plant diseases.
Chayote (Sechium edule), being a vining plant native to mesoamerica, requires well-draining soil to thrive.
To ensure adequate drainage, incorporate organic matter such as compost or well-rotted manure to improve soil structure and porosity.
Additionally, consider constructing raised beds if the native soil has poor drainage characteristics. This elevates the root zone above potential water accumulation zones, further mitigating the risk of waterlogging.
Soil percolation tests can be conducted prior to planting to assess drainage rates and inform necessary amendments.
With the site properly prepared for water management, attention must next be turned to optimizing soil and fertilization needs.
Step 3: Soil and Fertilization Needs
Chayote (Sechium edule) thrives in well-draining soil rich in organic matter, with loamy or sandy-loam textures being ideal for optimal root development and fruit production.
Fertilization should be approached with care, incorporating a balanced fertilizer with equal parts nitrogen, phosphorus, and potassium to support vigorous growth without compromising fruit quality.
The soil pH conducive to chayote cultivation generally ranges from 6.0 to 6.8, ensuring nutrient availability and proper plant function.
Ideal Soil Type
Soil composition and nutrient availability are critical factors in cultivating a healthy chayote plant, with well-draining, fertile loam being the ideal soil type.
To ensure the most conducive environment for chayote growth, consider the following soil characteristics:
- Texture: Loamy soil, which is a balanced mix of sand, silt, and clay, provides adequate drainage while retaining enough moisture and nutrients.
- pH Level: Chayote prefers slightly acidic to neutral soil, with a pH range of 6.0 to 7.0 being optimal.
- Organic Matter: Incorporate ample organic matter such as compost or well-rotted manure to enhance soil fertility and structure.
- Fertilization: Apply a balanced fertilizer, with equal parts nitrogen, phosphorus, and potassium, to support robust growth, especially during the plant’s vegetative phase.
Fertilizer Recommendations
Following the establishment of ideal soil conditions, selecting the appropriate fertilizer is crucial for the nourishment and growth of chayote plants. Chayote requires a balanced fertilizer that can provide a wide spectrum of nutrients.
A well-rounded N-P-K (Nitrogen, Phosphorus, Potassium) ratio, such as 10-10-10, is often recommended for vegetable plants and is suitable for chayote as well.
It is essential to apply the fertilizer according to the manufacturer’s instructions, usually once every 4-6 weeks during the active growing season.
Organic options, such as compost or well-rotted manure, can also be incorporated to improve soil structure and provide slow-release nutrients.
With fertilization needs addressed, it is equally important to consider the pH level requirements to ensure optimal nutrient uptake.
Ph Level Requirements
Adjusting the soil’s pH to the optimal range of 6.0 to 6.8 is imperative for maximizing chayote plant nutrient absorption and overall health.
Achieving the correct pH balance involves a nuanced understanding of soil chemistry and the chayote’s specific nutritional requirements.
Below are key steps in assessing and amending soil pH:
- Testing Soil pH: Utilize a reliable soil pH testing kit to determine the current pH level of your garden soil.
- Lime Application: If the soil is too acidic, apply agricultural lime to raise the pH.
- Sulfur Addition: For soil that is too alkaline, incorporate elemental sulfur to lower the pH.
- Regular Monitoring: Continuously monitor soil pH and adjust fertilization strategies accordingly to maintain the recommended pH range.
Careful attention to these details ensures that chayote plants have access to essential nutrients, promoting robust growth and fruitful harvests.
Step 4: Planting Your Chayote
Once your chayote has sprouted, select a well-draining location in your garden that receives ample sunlight for planting.
Chayote (Sechium edule) thrives in bright, direct light for at least 6 hours daily. The soil should be rich in organic matter with a pH ranging from 6.0 to 6.8 to optimize nutrient availability.
Plant the sprouted chayote at a 45-degree angle, with the broader end down and the shoot pointing upward, ensuring that the top of the sprout is just above the soil surface.
This positioning allows for proper growth orientation and root development. Space the chayotes 8-10 feet apart to accommodate their vigorous vine growth.
With the chayote securely planted, the focus now shifts to establishing an effective watering and mulching regimen to support its growth.
Step 5: Watering and Mulching
Regularly irrigating your chayote plant is crucial, as consistent moisture is essential to its growth, while mulching helps retain soil moisture and regulate temperature.
To ensure optimal hydration and soil conditions, consider the following:
- Watering Depth: Apply water to a depth of approximately 6 inches to encourage deep root development, which enhances the plant’s drought resistance.
- Frequency: During the growing season, water the chayote every 5-7 days, adjusting based on rainfall and temperature.
- Mulch Materials: Use organic mulches such as straw or wood chips. They not only conserve moisture but also add nutrients as they decompose.
- Mulch Thickness: Maintain a 2-3 inch layer of mulch to suppress weeds and maintain an even soil temperature, reducing stress on the plant.
Step 6: Managing Pests and Diseases
Regarding pest and disease management, it is imperative to monitor your chayote plants closely for signs of infestation or illness to ensure a healthy crop. Employing integrated pest management (IPM) strategies can be effective.
Regularly inspect leaves for aphids, mites, and beetles, and check for disease symptoms such as wilting, spots, or rot.
Here is a table summarizing common pests and diseases, along with their indicators and management strategies:
| Pest/Disease | Indicators | Management Strategy |
|---|---|---|
| Aphids | Clusters of small insects | Use insecticidal soap or neem oil |
| Mites | Webbing, yellowing leaves | Introduce predatory insects, prune affected areas |
| Beetles | Holes in leaves | Handpick, use floating row covers |
| Powdery Mildew | White, powdery spots | Apply sulfur-based fungicides |
| Bacterial Wilt | Wilting, stunted growth | Remove and destroy affected plants, rotate crops |
It’s crucial to tackle issues promptly to prevent spread and minimize damage.
Step 7: Harvesting and Storage
Upon reaching maturity, typically five to seven months after planting, chayote fruits are ready for harvest and require proper storage techniques to maintain freshness.
The following guidelines should be adhered to:
- Harvest chayote by cutting the fruit from the vine with sharp shears, leaving a short piece of stem attached to reduce the risk of rot.
- Inspect fruits for blemishes or soft spots, as these can accelerate spoilage and affect neighboring fruits during storage.
- Store chayote in a cool, well-ventilated area with a temperature range between 7.2°C and 10°C (45°F and 50°F) to slow down the respiration rate and prolong shelf life.
- Avoid washing fruits before storage to minimize moisture accumulation, which can lead to fungal growth and quicker degradation.
Conclusion
In the garden of life, the chayote vine bears fruit akin to precious emerald gems, nurtured from the womb of the earth.
Each step, from the careful selection of the seed to the vigilant protection against pests, mirrors the meticulous artistry of nature’s own canvas.
The harvest yields not just sustenance, but a testament to the harmony between human toil and the soil’s bounty, encapsulating the delicate dance of growth, resilience, and the fruition of patient endeavor.


